Compiling a barebones zig binary
This is the first post in a series of blogs where I intend go through some basics of osdev.
An operating system needs to run on a bare metal system. We simply need to do these three things:
- Compile for the RISC-V 64-bit architecture
- Run the operating system using QEMU using
zig build run - Print "Hello, World!" to the console using the SBI interface
NOTE: This blog is partially inspired by Writing an OS in Rust
Why RISC-V?
Honestly, I do not have a proper answer for this. I just decided to learn RISC-V assembly one day and then fell into the rabbit hole of osdev. It being fully open source with documentation and a lot of the hardware implementation details freely available makes writing code for RISC-V a lot easier. There are some key differences between RISC-V and x86 (e.g., RISC-V does not make use of an interrupt descriptor table), but the overall concepts are mostly the same.
Getting started
Before we begin, we need to create a Zig project. This blog assumes you have some knowledge of the Zig programming language. I usually like to start with a very basic build script, so that's what we would be doing for the first part of this blog.
You will need:
- Zig version 0.14.0 (later versions are fine, but the syntax and especially the build script could be different)
- qemu-system-riscv64
- Some standard utilities such as
file,gdb,objdumpwould be helpful if you want to go beyond this blog
Familiarity with Zig, or at the very least C, is also somewhat of a requirement. The point of a language is to solve problems, and you will not be doing much of that if you spend your time fighting the language.
To create a new project, you simply do:
$ mkdir kernel # can be named anything you want
$ cd kernel
$ zig init
This should create:
- A
src/folder withmain.zigandroot.zigsource files within it - A
build.zigfile which acts as our build script - A
build.zig.zonwhich stores some of our project's metadata and can also be used to define dependencies
From here on out, I will use the alias "rv64" instead of RISC-V 64-bit.
Compile for the RISC-V 64-bit architecture
In this section, we will compile a very basic binary with our code. We will be writing some inline assembly, which is useful for debugging and for having more fine-grained control over the generated instructions.
Setting up the build script
Our build script is defined in the build.zig file that sits in the root of your project. I recommend reading the boilerplate code and all the comments if you wish to learn more behind the why instead of just the how when it comes to using the Zig build system. Once you are done reading, you can delete all the comments and all the contents of the build() function, as we will be writing our own.
We first need to specify a "target". This is simply telling the compiler "what our code is going to run on". Our target is going to be:
- Target CPU architecture: RISC-V 64-bit
- Target ABI: None
- Target OS: None
In the code for our build script, we represent the above information like so:
const target = b.standardTargetOptions(.{ .default_target = .{
    .cpu_arch = .riscv64,
    .abi = .none,
    .os_tag = .freestanding,
} });
We also need to point to our source files, so the compiler knows what files to compile into the final binary.
const exe = b.addExecutable(.{
    .root_source_file = b.path("src/main.zig"),
    .name = "kernel",
    .target = target,
    .optimize = optimize,
    // this is an argument that is passed over to llvm. `.medium` is what we
    // need to set it to if we want to compile for our specified targets. Our
    // code would just not compile otherwise
    .code_model = .medium,
});
Finally, we need to add a linker script. We will write this in the next section of this blog.
exe.setLinkerScript(b.path("linker.ld"));
And with a few more additions, our final build.zig should look like this:
// build.zig

const std = @import("std");

pub fn build(b: *std.Build) void {
    // a bare metal RISC-V 64-bit target
    const target = b.standardTargetOptions(.{ .default_target = .{
        .cpu_arch = .riscv64,
        .abi = .none,
        .os_tag = .freestanding,
    } });
    // with default optimisation settings
    const optimize = b.standardOptimizeOption(.{});

    const exe = b.addExecutable(.{
        .root_source_file = b.path("src/main.zig"),
        .name = "kernel",
        .target = target,
        .optimize = optimize,
    });

    exe.setLinkerScript(b.path("linker.ld"));
    // move the compiled binary to `zig-out/bin` so we can use it
    b.installArtifact(exe);
}
I have added comments to hopefully explain all that I have added to this script. It is very simple for now, we will be getting crazier in the posts following this one.
Writing a linker script
In the previous section, we refer to a link
If you don't already know what a linker script is, it simply instructs our compiler on where code should go where.
// linker.ld

OUTPUT_ARCH(riscv)
ENTRY(_start)

SECTIONS {
    /* place our code starting from this address */
    . = 0x80200000;

    .text : {
        KEEP(*(.text.boot));
        *(.text .text.*);
    }

    .rodata : {
        *(.rodata .rodata.*);
    }

    .data : {
        *(.data .data.*);
    }

    .bss : {
        *(.bss .bss.* .sbss .sbss.*);
    }
}
In the above script, we first define our output architecture. This is, of course, RISC-V.
Next, we define our "entrypoint". This is where our kernel code starts from. We use _start, as it is customary to use _start as a starting point in such projects. And also because this sets a clear separation from normal Zig projects, which use the main function as their entrypoint.
Next, we define the sections. This is where we define "where goes what".
- We can assign a value to a "location" using the
. =syntax- With this, it is easy to deduce that the first "location" in our kernel code should be at 0x80200000
- We chose this value as that is where OpenSBI will look for our kernel code. We will discuss more on OpenSBI later on in this blog post
- Next, we define the
.textsections. This includes all of our executable code. All the instructions that our CPU will execute- We also instruct the linker to put the .text.boot section on top of everything else, and to not "drop" it (i.e., keep it, even if it seems like it's not being used)
- We then define
.rodata, which is read-only data and.datawhich is readable and writable data - Finally, we define
.bss. This is the section where all of our uninitialised data sits.- To understand why
.bssis used, I will redirect you to this stackoverflow answer
- To understand why
Writing actual OS code
OK, now let's write some basic OS code. Since we are running this on bare metal, we won't have fancy OS-specific features such as /dev/stdout. I like to use deadbeef for debugging the initial boot.
Q: But wait, what is deadbeef?
A: To put it simply, it is a number. 0xdeadbeef to be exact. We will set the t0 register to this value to verify that our code is loaded.
Let's start by deleting src/root.zig, as we will not be using it. Let's also get rid of all the boilerplate in src/main.zig, as we will not be needing it either. Now, remember when we declared _start as our entrypoint? Well, this means we now have to make a function called _start.
// src/main.zig

export fn _start() linksection(".text.boot") callconv(.naked) noreturn {
    asm volatile ("li t0, 0xdeadbeef");

    while (true) {}
}
Let me explain the above code.
- The
exportkeyword makes the function available under its given name at link time. Without this, our linker will not be able to find the entrypoint we defined in the [linker script](### Writing a linker script). linksection(".text.boot")marks this function to fall under the ".text.boot" section. If you remember our linker script, this occupies the topmost section of memory in our kernel.noreturnmarks the function as something that will never return, pretty simple.- Then we write some basic RISC-V assembly. The
liinstruction stands for "load immediate". In our example, we load the value0xdeadbeefinto the registert0. - Finally, we create an infinite loop to uphold the return type of
noreturn. We do not want our system to reset, even if the OS has nothing left to do.
Let's try to build this code. We do that with zig build.
A binary should be output into the zig-out/bin folder relative to the project root. If we inspect this binary with objdump, we can inspect if our linker script is working properly.

As you can see in my screenshot, _start is indeed at the address 0x80200000. There is some debug information even above this, but it is not a problem, as it will be ignored by QEMU when actually running our kernel.
With this, we have successfully completed the first half of this blog!
Run the operating system using QEMU
In this section, we would be running our compiled binary using the QEMU. QEMU supports emulation of quite a few physical RISV-V dev boards, but we will be focusing on their "virt" machine, which is a fully in-software implementation of the RISC-V ISA.
1. How to use QEMU to run our kernel
Let's begin with learning what CLI arguments we need to pass into QEMU.
The command we will be using is
$ qemu-system-riscv64 -nographic -machine virt -bios default -kernel zig-out/bin/kernel
qemu-system-riscv64: This is the name of the QEMU binary that we will use-nographic: We do not want a GUI for QEMU to pop up. Serial output, which is what we will use for debugging, will also be directed to your host machine's stdout.-machine virt: we specify the "machine" we wish to use-bios default: This option is for setting the boot code that QEMU executes before everything else. By default, it is set to a version of OpenSBI that QEMU bundles with its RISC-V system binaries.-kernel zig-out/bin/kernel: Similar to the-biosoption, but this is generally used for code that executes after the initial boot code. In the future, we will be creating a disk image and passing that to QEMU. However, using-kernelis more convenient to get started with. We then pass in the path of our compiled binary as a value for the argument.
Upon running the command, you should see some debug info provided by OpenSBI.
OpenSBI v1.5.1
   ____                    _____ ____ _____
  / __ \                  / ____|  _ \_   _|
 | |  | |_ __   ___ _ __ | (___ | |_) || |
 | |  | | '_ \ / _ \ '_ \ \___ \|  _ < | |
 | |__| | |_) |  __/ | | |____) | |_) || |_
  \____/| .__/ \___|_| |_|_____/|____/_____|
        | |
        |_|

... there would be more stuff printed after this ...
You can now use the QEMU console to inspect the state of all of your registers. To access the console, you simply use the keyboard combination Ctrl + a followed by Ctrl + c. You should see a console where you can type in commands.
To inspect our registers, we type in the command:
(qemu) info registers
Now the output will be a little verbose, as the command not only outputs all the base registers, but also some of the special registers, which we will never need to directly modify in most cases (e.g., scause, sepc etc.).
In the code we wrote, we set the value of the t0 register to 0xdeadbeef. t0 register is used to store temporary values, i.e., values that are not needed and shall be discarded when you call the next function. In contrast, the a0--a7 registers have their value preserved between function calls, as they are used for passing data in between different functions.
The line we are looking for is the following:
x4/tp 0000000080048000 x5/t0 00000000deadbeef x6/t1 0000000000000002 x7/t2 0000000000001000
And sure enough, we see our deadbeef. The reason we used this value for debugging is that it is easy to spot by the human eye or an automated testing/debugging tool.
FUN FACT: 0xdeadbeef was originally used to mark memory that has been allocated but not used.
2. Improving the "development loop"
So right now, we can make a change to our code. But to see the results, we have to first compile our code with zig build, and then also run the QEMU command with the right flags and all that. While all of it is possible, it acts as a hurdle between us hitting save and us seeing the results. And if your shell's history ever resets, you will need to dig through QEMU's man page to find the right commands. Our arguments are pretty simple right now, but they can get complicated very quickly if we wish to add VGA devices, virtual disks, network adapters, etc.
To solve this problem, we can create "build steps". These are commands we can run alongside zig build that do extra things.
We will start by defining zig build run to build our code and run it inside QEMU.
Let's start by creating a function to add our build step:
fn runWithQemuCmd(b: *std.Build) void {
    const run_cmd = b.addSystemCommand(&.{
        "qemu-system-riscv64", "-nographic",
        "-machine",            "virt",
        "-bios",               "default",
        "-kernel",             "zig-out/bin/kernel",
    });
    run_cmd.step.dependOn(b.getInstallStep());
    if (b.args) |args| run_cmd.addArgs(args);

    const step = b.step("run", "Run kernel with QEMU");
    step.dependOn(&run_cmd.step);
}
We then call this function at the end of our main build() function:
runWithQemuCmd(b);
And thats it! You can now run zig build run, and it should take you straight to QEMU with your compiled binary set as the kernel.
Print "Hello, World!" to the console using the SBI interface
Now, in this last section, we will discuss a little about "OpenSBI". I kept mentioning it throughout this blog, but I never truly explained what it is. The easiest way to explain OpenSBI is that it is an operating system that runs below your actual operating system. It was designed to provide a standard API on top of various different RISC-V chips. Dev boards like the Waveshare VisionFive 2 actually provide builds of OpenSBI meant to run on their boards. This means that we, the operating system developer, have a much more standardised way of completing basic tasks such as printing characters via a serial connection or setting timers, without worrying too much about the specific hardware details.
While I keep using the term "OpenSBI", it is just an implementation of the SBI spec. More documentation on the spec can be found here. I will continue using the term "OpenSBI", as that is what we are using here, but the API should be the same no matter what implementation you are using.
The specific API we are interested in is the one provided by the Debug Console Extension. We will implement a more comprehensive "library" to communicate with OpenSBI in a future post. For now, let's just write some assembly.
The following text references chapter 12 of the third version of the SBI specification.
According to the documentation, this is the API we need to call:
struct sbiret sbi_debug_console_write(unsigned long num_bytes,
                                      unsigned long base_addr_lo,
                                      unsigned long base_addr_hi)
Let's explain the above function signature:
struct sbiret: the return value consists of two u64 integersunsigned long num_bytes: how long is our string, accepts u64unsigned long base_addr_lo: The lower 64 bits of the address where our string is storedunsigned long base_addr_hi: The upper 64-bits of the address where our string is stored- This option is ignored, as most devices only have 64 bits of addressable memory
We pass these parameters along with the extension ID and the function ID using a simple syscall interface.
- Extension ID is passed via the
a7register - Function ID is passed via the
a6register - Function arguments are passed via the
a0-a5registers - Return values are passed back to our code via the
a0anda1registers - The extension ID of the Debug Console Extension is
0x4442434Eand the function ID of the write function is0.- The
a7register will be set to0x4442434E, and thea6register will be set to0 - The
a0register will contain the length of our string - The
a1register will contain the address of our string - The
a2-a5registers will be set to 0 - We will make a syscall using the
ecallinstruction - We will be ignoring the returned values for now to keep things simple. I plan to make a more in-depth post exploring OpenSBI and creating a proper library for communicating with it, so stay tuned!
- The
Our resulting code should look like this:
export fn _start() linksection(".text.boot") callconv(.naked) noreturn {
    const output = "\n\nHello, World!\n";

    asm volatile (
        \\li a2, 0
        \\li a3, 0
        \\li a4, 0
        \\li a5, 0
        // function ID
        \\li a6, 0
        \\li a7, 0x4442434E
        \\ecall
        : // this is empty as it is used for defining return values, which we are ignoring
        : [len] "{a0}" (output.len),
          [ptr] "{a1}" (@intFromPtr(output)),
    );

    while (true) {}
}
The specific syntax and thought process behind such syntax for inline assembly is beyond me. Consult the official Zig documentation if you wish to learn more about it.
And if we run this code using zig build run:
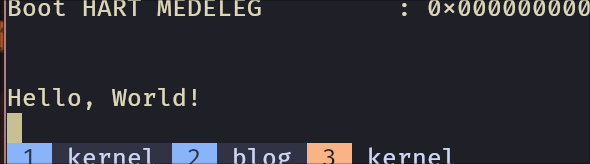
And VOILÀ! We have a barebones Zig binary. We will need proper memory management, scheduling, drivers and a lot more before we are able to call it a "kernel", but this is a good start. I think this is a good place to end at for today!
I will be adding more to this series of blogs, so stay tuned for more! You can add this blog to your favorite RSS reader to get notified when I upload anything new.